Overview
What is a temporary disk and how do I change sizes to and from this type
Some VM sizes contain a temporary disk. The temporary disk provides short-term storage for applications and processes. Data on the temporary disk may be lost during a maintenance event, when you redeploy a VM or change the size.
On Azure Linux VMs, the temporary disk is usually /dev/sdb and on Windows VMs the temporary disk is D drive by default. You identify it by a DATALOSS_WARNING_README.txt file on the temp disk. The temporary disk is not encrypted by server side encryption unless you enable encryption at host. For more information see this Microsoft Link.
You can move from a VM size with a temporary disk to one without and vice versa.
Some examples of VM sizes with temporary disks include (where # = vCPU number):
-
-
D# v2
-
B#ms
- D#s v3
- D#ads v5
-
Some examples of VM sizes without temporary disks include (where # = vCPU number):
-
- D#s v5
- E#as V5
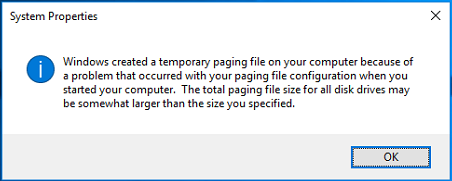
You may get a Windows error such as:
To Change to No Temp Disk
Follow these steps to change a temp-disk size --> no-temp-disk size.
- Deallocate the VM in the MCIT portal via: Manage > Virtual machines > Open > Deallocate
- Resize the VM in the MCIT portal via: Manage > Virtual machines > Open > Resize (if you cant see the size you want see appendix A)
- Start the VM in the MCIT portal via: Manage > Virtual machines > Open > Start
- RDP to the VM
- Navigate to Control panel > system > Advanced > Performance settings > Advanced > Change
- With the C drive selected choose "System managed size" then Set
- Click ok on all the windows then select restart now.
To Change to a Temp Disk
Follow these steps to change a no-temp-disk size --> temp-disk size.
- Deallocate the VM in the MCIT portal via: Manage > Virtual machines > Open > Deallocate
- Resize the VM in the MCIT portal via: Manage > Virtual machines > Open > Resize (if you cant see the size you want see appendix A)
- Start the VM in the MCIT portal via: Manage > Virtual machines > Open > Start
- RDP to the VM
- Navigate to Control panel > system > Advanced > Performance settings > Advanced > Change
- With the D drive selected choose "System managed size" then Set
- With the C drive selected choose "No paging file" then Set then yes
- Click ok on all the windows then select restart now.
Appendix A
Sometimes the VM size you want to change to is not available. There can be a resolution to this. First check if you can resize in Azure portal just in case the size is not being pulled from Azure to the MCIT portal correctly. If you still cannot change to the size you want and you have confirmed that size is available in the Azure datacenter please contact MCIT senior support for help with this.
If you are confident the basic process is to snapshot, create disk, create new vm with new size, delete old VM and unmap it, clean up DNS, map new VM in the MCIT portal then fix the pagefile.