Overview of the Reports Autoscale Monitoring Dashboard As a client you can see all your deployments...
Deploy a Session Host with a Golden Image
After a Golden Image is created, deploy a new Session Host with it
Create Session Hosts from the Golden Image
Deploy a new session host using a golden image via the MyCloudIT platform.
- If you do not have any golden images, please follow KB - Create a new Golden Image.
- Note: It is highly recommended that session hosts in a given collection/host-pool are all exactly the same 'image'. For this reason, you should deploy the total number of session hosts into your collection/host-pool that your users will need and after doing so remove any previous session hosts. See Appendix A.
Process
- Log in to the MyCloudIT portal and, if applicable, navigate to the correct customer.
- Navigate to Manage > Deployments, Choose your deployment by clicking the blue dot to select it.
- The Collections/Host Pool table is populated, click the ellipses next to your collection/host-pool and click Hosts. (This should be the collection/host-pool that you want to deploy a new session host to)
- In the new modal, click on the + Create button.
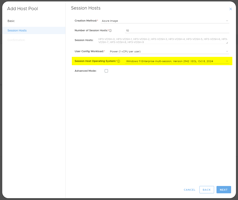
- Follow the wizard to create a new session host, with these selections:
- Creation Method: 'Golden Image'
- Golden Images Option: 'From MCIT Image Selection'
- Select the golden image. Note the version will be selected from the version set as the 'active version'.
- Once the Create button is clicked, the deployment will take from 15-120 minutes, depending on various factors including how many session hosts you are creating.
- We have found that the networking of newly deployed VM's via golden image is sometimes not active on the first boot. If you have waited an appropriate amount of time (no less than 20 minutes) and the VM's are not responding to logon requests follow see this article: https://knowledge.mycloudit.com/v3/redeploy-vm
Appendix A: Remove Session Hosts
Once you have deployed session hosts from a Golden image to your collection/host-pool, you should remove any old session hosts. There are various methods.
During the testing phase, the easiest method is to not allow collection / drain mode on the old session hosts. This can be done by:
- Log in to the MyCloudIT portal and, if applicable, navigate to the correct customer.
- Navigate to Manage > Deployments, Choose your deployment by clicking the blue dot to select it.
- The Collections/Host Pool table is populated, click the ellipses next to your collection/host-pool and click Hosts.
- Select the session hosts you want to deny users to log on to (the old ones).
- Click on the Drain Mode button.
- Select Don't allow new connections option on the session hosts.
To delete a session host:
- Log in to the MyCloudIT portal and, if applicable, navigate to the correct customer.
- Navigate to Manage > Deployments, Choose your deployment by clicking the blue dot to select it.
- The Collections/Host Pool table is populated, click the ellipses next to your collection/host-pool and click Hosts.
- Select only the session hosts you want to delete (the old ones).
- Click on the Delete button and follow the prompts (you will be given the choice to delete the network-card and disk associated, generally you should do this unless these is a reason to keep the data on the disk).
- The delete process may take up to 15 minutes per VM.
To remove a session host from an RDS collection, you can create a new collection and transfer the old session hosts to it if you want to keep them.
Tip: The MyCloudIT Portal does not support session host transfers between host pools for AVD, if this is required, contact MCIT support for various options.