Manage, delete, and update golden images via the MyCloudIT platform. Manage Golden Images Once...
Overview
This guide will assist you to create a golden image and then deploy session hosts from this image. A MyCloudIT golden image is a 'copy' of a AVD or RDS session host. It includes everything on the disk and can include:
- Windows operating system and patches
- Installed Software and updates
- Software settings
- User settings
This "image" may also be referred to as a golden image, clone image, master image, sysprep image, or base image. The primary advantages of using a golden image are:
- Reduce errors
- Reduce management complexities
- Increase consistency
- Improved user experience
- Save on deployment costs
- Save on technical support costs
- Assist with down time
- Reduce backup requirements
Acronyms used in this document:
- AAD - Azure Active Directory (Microsoft cloud hosted as a service)
- AD - Active Directory (An instance of an Microsoft Active Directory Domain Services install on a physical server, VM in azure, etc)
- AADC - Azure Active Directory Connect (One of Microsoft's systems you can use for facilitating AD hybrid identity)
- AADC-CS - Azure Active Directory Connect Cloud Sync (One of Microsoft's systems you can use for facilitating AD hybrid identity)
- AVD - Azure Virtual Desktop (Microsoft's platform for delivering Windows shared/personal virtual desktops/applications via Azure)
- RDS - Remote Desktop Services (Microsoft's suite of services for delivering thin clients with a full desktop or 'remote apps' via the Windows server operating system)
Process Overview
Creating a Golden Image is done in 5 primary steps:
- Choose a base image.
- Clone a session host.
- Sysprep the cloned session host.
- Create the Golden Image.
- Delete the cloned images and resources.
Step 1 - Choose a Base Image
First select the base image to create the golden image. There are two options:
- Option 1: Clone an existing session host that is already configured the way you want it.
- Log on to the target session host as an administrator (See Appendix A).
- Create a local user with administrator access (See Appendix B).
- If your RDS or AVD deployment uses FSLogix (most AVD deployments do), perform steps in Appendix F.
- Make sure the Session Host is set to maintenance mode (if in Autoscaling) and is set to not allow new connections. Session Host should be completely drained of al user sessions before starting the Clone process.
- Option 2 (Recommended): Deploy a fresh collection/host-pool and configure it from scratch to use it for future image updates.
- Log in to the MyCloudIT portal and, if applicable, navigate to the correct customer.
- Navigate to Manage > Deployments, Choose your deployment by clicking the blue dot to select it.
- After deployment selection, in the Collection/Host-Pool section, click on the + Add button.
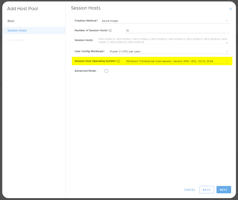
- Follow the wizard to create a fresh new collection/host-pool with one session host.
- It is recommended to name the collection differently. An example name for the collection/host-pool could be: "GoldenImage-Pool"
- We suggest session index be set to something like 901 to make it clear this is the master VM.
- Log on to the session host console as an administrator (see Appendix A).
- Create a local user with administrator access (see Appendix B).
- If your RDS or AVD deployment uses FSLogix (most AVD deployments do), perform steps in Appendix F.
- Customize the session host with windows updates, software installation, settings etc (See Appendix C).
The advantage of option 2 is that you will not be bringing any existing technical, user or legacy issues from a currently in use session host. The other advantage is that over time, Windows and other software can degrade in performance and starting 'fresh' can resolve this. This session host (if never used by users) can then be used going forward as the base for all image updates.
Tip: When using option 2, you will need to deploy the golden image to your primary collection / host-pool during downtime to test it. In larger environments, you may deploy it to a test collection / host-pool for testing.
Contact MCIT support for advice for your specific requirements and the options to best suit your business.
Step 2 - Clone a Session Host
Caution: Make sure there are no users on your chosen session host as the clone process will power off (deallocate) the virtual machine.
- Log in to the MyCloudIT portal and, if applicable, navigate to the correct customer.
- Navigate to Manage > Deployments, Choose your deployment by clicking the blue dot to select it.
- The Collections/Host Pool table is populated, click the ellipses next to your collection/host-pool and click Hosts.
- Note: If option 2 in step 1 was chosen, you will select your new collection/host pool (for example: GoldenImage-Pool).
- Select the session host you wish to clone (chosen in Part 1) and click on the Clone button. Note: You may need to set this session host to maintenance mode in Manage > Autoscale. Note: The VM must be running to start the clone process.
- Follow the steps of the clone wizard. The following recommendations are:
- Keep the resource group setting as the default suggested (yourRG-Name-clone).
- Make sure the target location is the same as the source location.
- Keep the VM Name setting as the default suggested (yourSH-Name-clone).
- Use the same VM size that will be used for the final production session host. We do not recommend anything less than a D2_v3.
- Leave the network settings default as this is only a temporary network, it will be deleted later.
- Once you have started the clone process it will take from 10 to 30 minutes to complete. Please do not attempt to login to the either the target Virtual Machine or the Clone Virtual Machine while the clone is in process as this could cause a clone failure/error.
Warning: At this point port TCP 3389 will be open to the public for this cloned VM. This is fine for a few hours as the connection requires authentication. If you plan to work on this clone for more than a few hours we recommend updating the network security group rule to allow only your IP address to stop brute force attempts on the clone.
Step 3 - Sysprep the Cloned Session Host
The System Preparation tool (sysprep) is a Microsoft tool for generalizing a Windows installation so it can then be used as the base image for multiple computers (in our case session hosts). For general information on sysprep see Microsoft documentation here.
- Log in to the MyCloudIT portal and, if applicable, navigate to the correct customer.
- Navigate to Manage > Deployments, Choose your deployment by clicking the blue dot to select it.
- The Collections/Host Pool table is populated, click the ellipses next to your collection/host-pool and click View Clones.
- Note: If option 2 in step 1 was chosen, you will select your new collection/host pool (for example: GoldenImage-Pool).
- Select your virtual machine.
- Connect via RDP to the virtual machine as the local administrator user you created.
- If you chose option 1 in step 1, you will now need to Customize the session host with windows updates, software installation, settings etc (See Appendix C).
- It is recommend to remove various profiles (See Appendix E).
- If you use FSLogix for RDS or AVD/WVD, see Appendix F.
- You will now have to sysprep the clone:
- Open powershell as administrator.
- Type: hostname.
- Warning: Confirm the hostname is correct (you should be in the powershell window of the clone virtual machine). If not, do not sysprep the machine.
- Paste the following command (if this does not work, see Appendix D):
C:\Windows\system32\sysprep\sysprep.exe /quiet /generalize /oobe /shutdown- If Sysprep runs but fails, the log can be found at: %WINDIR%\System32\Sysprep\Panther\setupact.log
- Wait for the virtual machine state to be "stopped", this can take from 10 to 180 minutes, depending on complexity and performance of the VM
- Log back into the MyCloudIT portal and, if applicable, navigate to the correct customer.
- Navigate to Manage > Deployments, Choose your deployment by clicking the blue dot to select it.
- Note: If option 2 in step 1 was chosen, you will select your new collection/host pool (for example: GoldenImage-Pool).
The Collections/Host Pool table is populated, click the ellipses next to your collection/host-pool and click View Clones.
- Note: If option 2 in step 1 was chosen, you will select your new collection/host pool (for example: GoldenImage-Pool).
- Select your virtual machine.
- Click Sysprep link and click on the Confirm button.
- Deallocate the clone virtual machine
Step 4 - Create the Golden Image
We will now create our final golden image from the cloned / syspreped machine.
- Log back into the MyCloudIT portal and, if applicable, navigate to the correct customer.
- Navigate to Manage > Deployments, Choose your deployment by clicking the blue dot to select it.
- Note: If option 2 in step 1 was chosen, you will select your new collection/host pool (for example: GoldenImage-Pool).
- The Collections/Host Pool table is populated, click the ellipses next to your collection/host-pool and click View Clones.
- Select your virtual machine.
- Click on the + Create Image button.
- Follow the wizard to create a golden image. The following recommendations are:
- Use an existing resource group, choose your main deployment's resource group
- Note: Do not put the golden image in the clone resource group as that will be part of the clean-up/delete process.
- Give the image a name such as "Sales-Image" or select an existing image to add a version to it.
- Give the image a version such as "Sales-Collection-v172-IMG."
- Give some detailed notes of the things you have done to this session host and the original VM you cloned from. Also add if you are using option 1 or 2 in step 1.
- Use an existing resource group, choose your main deployment's resource group
- Please wait for 10 minutes while the image is generated until proceeding to Step 5.
- You will find your golden image by navigating to Manage > Images then selecting your image.
Step 5 - Delete the Clone
Once a clone has been Syspreped, it is essentially destroyed as Azure will not allow you to (easily) turn on that virtual machine again. Since there is no use for it now after we have created the golden image, it is recommended to delete the clone and its associated resources.
- Log back into the MyCloudIT portal and, if applicable, navigate to the correct customer.
- Navigate to Manage > Deployments, Choose your deployment by clicking the blue dot to select it.
- Note: If option 2 in step 1 was chosen, you will select your new collection/host pool (for example: GoldenImage-Pool).
- The Collections/Host Pool table is populated, click the ellipses next to your collection/host-pool and click View Clones.
- Choose your virtual machine clone.
- Click on the + Delete Clone button.
- In the modal, select 'I Confirm' and click on the Delete button.
Next Steps:
After the golden image has been created, you can create a new session host with the image. In addition, you can manage and update your golden image. Please see the following:
- Knowledge Base - Create a new session host form the Golden Image.
- Knowledge Base - Manage and update Golden Images.
Appendix
Appendix A: Log on to the Session Host
Connect by clicking "Connect" in the Azure portal on the MSDC VM, then remote desktop to the session host by using its name. Example command: "mstsc /admin /v:spark-RDSH-0"
Appendix B: Create a local administrator user
Create a local administrator user account. This user is local to this windows machine and not a Domain / Active Directory account. This can be done various ways, including via powershell (run as administrator) with the commands:
net user localadmin aS3curePwd$$ /add
net localgroup administrators localadmin /add
Note: Change "aS3curePwd$$" to your own complex password that is not the same as any other password.
Warning: Do not run the above powershell on a domain controller.
Appendix C: Customize a Session Host
Once you log into the session host, the common steps administrators perform are:
- Install all Windows updates
- Install all user software (examples: Adobe reader, Microsoft Office). Pro Tip for RDS: You may need to use RDS install mode when installing applications
- Configure per machine settings that are not centralized
- Configure per user settings that are not centralized
- Tune the OS and software
- Add RMM / Monitoring tools
- Install anti-malware / anti-virus
- Restart the session host multiple times during the above configurations
Appendix D: Sysprep Alternate Method
If Sysprep does not work, an alternate method is open powershell as administrator and perform the following:
- Type: hostname
- Warning: Confirm the hostname is correct (that you are in a powershell window of the clone virtual machine). If not, do not sysprep the machine!
- Type: c:
- Type: cd $Env:windir\System32\Sysprep\
- Type: .\sysprep.exe
- Select: OOBE (options shown in the screenshot)

- Select: Generalize
- Select: Shutdown
- Select: OK
- Wait for the virtual machine state to be "stopped", this can take from 10 to 180 minutes depending on complexity and performance of the VM
Appendix E: Delete profiles on the clone before Sysprep
We recommend you remove any profiles (except the local administrator profile and the default profile). To achieve this perform the following:
- Reboot (restart) the session host clone and log on with your new localadmin user.
- Press Win+R on the keyboard or bring up a powershell window.
- Type the following: SystemPropertiesAdvanced and press enter.
- Under "User Profiles" click "Settings".
- Select the profile you wish to remove and click "Delete".
- Do this for all profiles except localadmin and default profile.
Appendix F: FSLogix Considerations for Image Creation
Microsoft FSLogix is a set of solutions that enhance, enable, and simplify non-persistent Windows computing environments. The primary component of FSLogix that MyCloudIT integrates with is the set of features to allow centrally stored roaming AD-User profiles.
If your RDS or AVD/WVD deployment uses FSLogix, you may need to consider the below options. Note that most MCIT deployed AVD deployments use FSLogix.
You will want to add the local administrator user you created in Step 1 to the FSLogix exclude group. So that when you log on to the clone FSLogix, it does not try to load a roaming profile for you as it will not be able to by design and may fail to login/logoff/save-settings correctly.
- This can be done various ways including in the computer management tool.
- Another way is via powershell (runas administrator) with the following command:
net localgroup "FSLogix Profile Exclude List" localadmin /add - You do not need to perform the following unless you are having trouble with FSLogix profile not logging on or off the clone correctly or other related issues.
- In some cases, if you are having issues with golden images, you may need to disable FSLogix profiles on the virtual machine you plan to clone. This can be done various ways but way is via powershell (runas administrator) with the following command:
Set-ItemProperty -Path "HKLM:\Software\FSLogix\Profiles" -Name "Enabled" -Value 0 - When you create a new session host from a golden image you will need to re-enable FSLogix Profiles on the Session Hosts:
Set-ItemProperty -Path "HKLM:\Software\FSLogix\Profiles" -Name "Enabled" -Value 1
- In some cases, if you are having issues with golden images, you may need to disable FSLogix profiles on the virtual machine you plan to clone. This can be done various ways but way is via powershell (runas administrator) with the following command: