MyCloudIT deploys AVD for you taking the complexity and time consuming nature out of such...
Overview of setting up a Microsoft Azure Virtual Desktop (AVD) deployment with a new domain controller via the MyCloudIT platform
This quick start guide will provide an overview of setting up a Microsoft Azure Virtual Desktop (AVD) deployment via the MyCloudIT system. AVD was formerly known as Windows Virtual Desktop (WVD). The MyCloudIT platform will look after the complexity of subnets, Active Directory, FSLogix management, Cloud Sync, DNS, Gateway Configuration, etc so you do not have to.
This guide covers the following scenarios:
- You want a brand new Microsoft Active Directory domain and AVD deployment (you may wish to migrate 'data only' from another system, if required).
- Note: If you have current Azure Active Directory / Office 365 users that need to be 'synced' with this deployment, please read the KB - Deploy AVD deployment with existing Azure AD / Office 365. Feel free to reach out to MyCloudIT support for advice on this scenario.
This guide currently does not cover the following scenarios:
- You have an on-premises, Azure or other existing Microsoft Active Directory domain that you need to keep.
- You want to migrate from a MyCloudIT classic (v2) or other RDS/AVD deployment without starting new.
Acronyms used in this document:
- AAD - Azure Active Directory (Microsoft cloud hosted as a service)
- AD - Active Directory (An instance of an Microsoft Active Directory Domain Services install on a physical server, VM in azure, etc)
- AADC-CS - Azure Active Directory Connect Cloud Sync (One of Microsoft's systems you can use for facilitating AD hybrid identity)
- AVD - Azure Virtual Desktop (Microsoft's platform for delivering Windows shared/personal virtual desktops/applications via Azure)
- RDS - Remote Desktop Services (Microsoft's platform for delivering shared Windows 'session hosts' via Windows server)
What you will need:
- A Microsoft Azure tenant and subscription that does not currently contain an AVD instance
- Note: In the MyCloudIT platform, only one AVD deployment is allowed per account. To manage multiple AVD deployments, please see KB - Can I Manage Multiple AVD Instances?
- An Azure custom domain name (public domain), already added to Azure (See Part 1).
- A login to the above Azure tenant with owner or contributor access to the subscription
- A login to the above Azure tenant with global administrator rights to AAD
- About 1-2 hours free time (includes waiting for Azure resources to be created, AADC-CS and FSLogix installs)
Process Overview
This AVD setup process is done in 4-parts:
- Add an Azure Custom Domain Name
- Deploy AVD
- Post Deployment Configuration
- Assign User Access
Part 1: Add an Azure Custom Domain Name
Every new AAD tenant comes with an initial domain name, domainname.onmicrosoft.com. You cannot change or delete the initial domain name, but you can add extra public domain names. Adding custom domain names helps you to create user names that are familiar to your users, such as dwilliams@sparks-solar.com.
You may choose to either:
- Register a brand new domain just for AVD use. Example: sparks-solar-avd.com.
- Register a brand new domain for use with multiple services, including AVD.
- Use an existing domain you own that is already in use for other services such as email, website, etc.
- If you use option, be aware of DNS record changes that may be required.
- If you are using the same tenant for AVD as the Office 365 email, you most likely already have a custom domain name and may not need to do anything except verify this is the case.
-
If this is the case, please read KB - Deploy AVD deployment with existing Azure AD / Office 365. Feel free to reach out to MyCloudIT support for advice on this scenario.
-
Note: You can add a custom domain name to Azure by following this guide: https://docs.microsoft.com/en-us/azure/active-directory/fundamentals/add-custom-domain
Part 2: Deploy AVD
The process is a 4-step wizard: Basic, Host Pool, Domain Controller, and Confirmation. To create your AVD deployment:
- Log in to the MyCloudIT portal and, if applicable, navigate to the correct customer.
- Navigate to Deploy > Cloud Workspace and then click Azure Virtual Desktops > Deploy.
- Follow the wizard to completion.
Below are some specific considerations to help you make choices on the various pages of the wizard.
Step 1 - Basic

- We generally suggest that Resource Group and Deployment Name are the same for simplicity. An example might be "Sparks-Solar".
- The Resource Location generally should be the closest to where the majority of your end users will connect from. For example, if most of your users operate out of Los Angeles you may select "West US" location.
- The Metadata Location should be the closest region to where you selected for Resource Location. For example, if most of your Resource Location is "France South," you should select "West Europe" as Metadata Location.
- Do not be concerned about this selection as the actual live resources for AVD will be the Resource Location. The Metadata Location is just where 'data about the data' regarding your deployment is stored and will not affect performance.
- Select a Deployment Prefix that will be used as a label as a prefix to Azure resources such as virtual machines and virtual network. An example might be "sparks".
- The Advanced Mode has network/subnet settings. Most customers should not need to edit this.
- You might edit this if you need to create a site-to-site VPN from Azure to your head office, where your head office already uses the 10.10.0.0/16 address space. In this case, you may need to change all the values to be in another address space, such as 192.168.0.0/16.
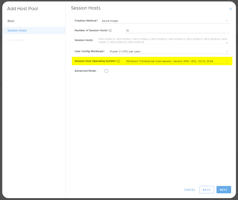
Step 2 - Host Pool
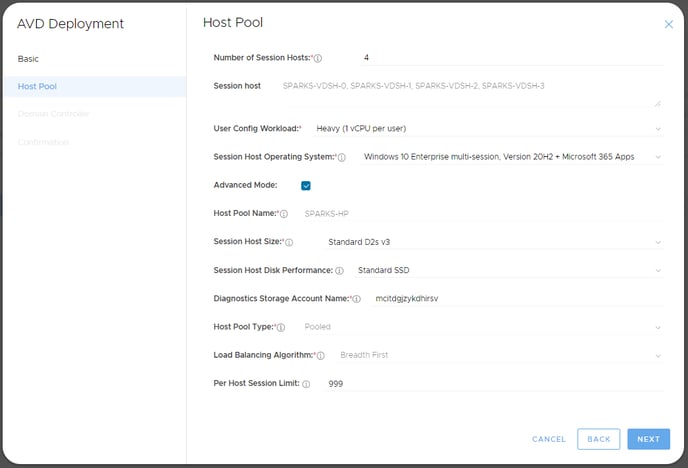
- Choose the initial Number of Session Hosts you wish to deploy. Do not worry as you can always add more later. We suggest one extra session host that you will leave deallocated as an emergency spare.
- The User Config Workload determines if you will use personal or pooled 'assignment type' for the host pool.
- If unsure, select "Heavy" here.
- If you select "Personal," the first host pool will be personal. This type means one session host is assigned to one (and only one) user. Example, VDSH-0 is assigned to Daniel, while VDSH-1 is assigned to Jess. This is the least common type of host pool use. It is only used in specific scenarios for example:
- Elevated security environments
- Very customized applications per user
- Specialized workloads requiring dedicated resources such as CAD
- Migration of personal workloads to Azure
- Development and test desktops
- If you select any other option, your host pool assignment type will be "pooled." This is the common option customers require. It means one or more users can share multiple session hosts. Pooled mode is very similar to how traditional RDS works. The vCPU per user is just an initial estimate used for the Autoscale feature. Do not worry if you are not sure or this is not correct as this can be tuned later.
- We suggest you choose a Session Host Size with at least a D2_v3 or higher specification to start with. This is to avoid Azure creation timeout issues we see with smaller sizes like B2 and A2. The size can then be changed easily post deployment under the "Virtual Machines" menu.
- The 'Standard SSD' option for Session Host Disk Performance is the general recommendation as they are the most cost effective option and is optimized for workloads that need consistent performance at mid IOPS levels. This performance tier will be used for the operating system disk attached to the AVD Session hosts.
- 'Premium SSDs' offer high-performance and low-latency for I/O-intensive applications. If you do not see the option for "Premium SSD," this is because you have selected a size that does not support premium disks. Generally sizes that include an "s," support premium storage, for example: D4s_v3.
- Use 'Standard HDDs' for Test scenarios or very low I/O workloads.
- The Per Host Session Limit should generally be left as 999. This sets the max amount of concurrent user sessions per session host. This can be useful to change in certain types of host pool but in general it is more effective to use the MCIT host AVD autoscale system to control manage session host load.
Step 3 - Domain Controller
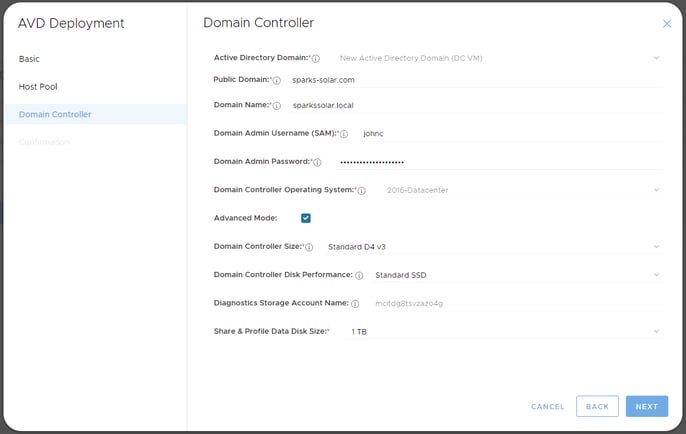
- The Public Domain will be a public facing DNS name for your users to access AVD from. This is also known as an Azure custom domain name. An example entry for this field is: "sparks-solar.com".
- If you have not added one to Azure yet, please cancel this deployment and restart this process once it has been added. See Part 1: Add an Azure Custom Domain Name for more information on this.
- Choose a Domain Name for your Microsoft AD root forest domain. This AD instance will be hosted on one domain controller virtual machine initially named MSDC-001.
-
Warning: Do not use a domain name that you have already used on another domain controller.
- Generally, if you do not have a reason to do otherwise, we suggest using a '.local' top level domain. For example, sparkssolar.local.
- This does not have to match in any way to your publicly resolvable domain names but if you have reason, this is a valid option.
- Contact MyCloudIT senior support for advice on your choice in relation to your current infrastructure and public presence.
-
- The Domain Admin Username should be specified as a username only, for example: 'dcadmin'. It should not be specified as dcadmin@company.com or company\dcadmin. This is a new user (domain admin) account that we will be created for you on the initial deployment. Warning: Do not select a name for the "Domain Admin Username (SAM)" that already exists in AAD. Select something unique such as "dcadmin".
- The Domain Admin Password should be a new, long complex password that you have not used anywhere else. This is for the new user (domain admin) account that will be created for you on the initial deployment.
- We suggest you choose a Domain Controller Size that is at least a D2_v3 or higher specification to start with. This is to avoid Azure creation timeout issues we see with smaller sizes like B2 and A2.
- The size can then be changed easily post deployment under the "Virtual Machines" menu. If you choose to resize the MSDC-001 virtual machine later on, we recommend at least 4GB RAM and two vCPU.
- A higher size may be required if you run extra services like management software or antivirus server on the domain controller. This VM should be running 24/7 and only be restarted for windows updates and other maintenance.
- 'Standard SSD' for Domain Controller Disk Performance is the general recommendation as they are a cost effective option and is optimized for workloads that need consistent performance at mid IOPS levels. The reason is that user profiles will be loaded from this disk thus affecting user experience. This performance tier disk will be used for the operating system and data disks attached to the Domain Controller / File Server VM.
- 'Premium SSDs' offer high-performance and low-latency for I/O-intensive applications. If you do not see the option for "Premium SSD," this is because you have selected a size that does not support premium disks. Generally sizes that include an "s," support premium storage, for example: D4s_v3. Most small business customers choose to create their company file share and home drives on this VM.
-
- Use 'Standard HDDs' for test scenarios or low I/O workloads.
- The Share & Profile Disk Size is the storage space of the data disk we attach to the MSDC-001 virtual machine. This will be used for user profiles and (optionally) company shares / home drives, if required. Note that the AD database is also stored on this disk.
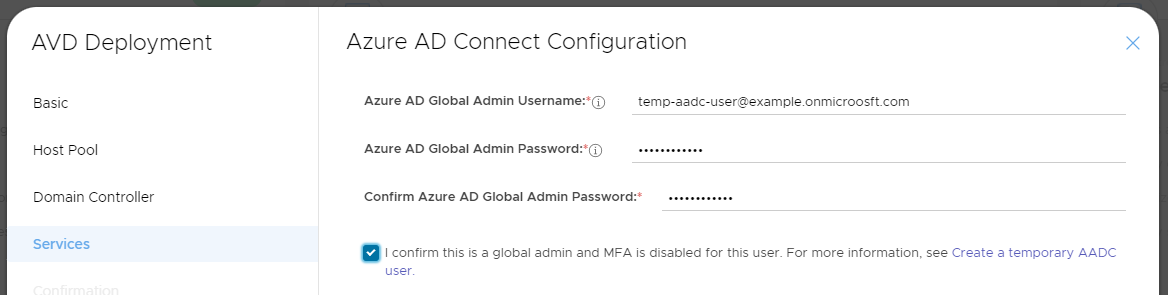
Step 4 - Azure AD Connect Configuration
Microsoft AVD requires Azure AD connect to be configures to "sync" your AVD (local) AD to Azure AD. We automate this for you but we need you to supply temporary Azure AD credentials to configure this service. After deployment is complete and Azure AD Connect syncing is confirmed this user may be deleted.
Due to Microsoft not providing MFA support for this the user cannot have MFA enabled. If you have MFA enabled or are not sure please create a user per this article: https://knowledge.mycloudit.com/v3/create-temp-aadc-user
Step 5 - Confirmation

- Review your AVD deployment settings and click on the Create button to start the process.
- Note: The process may take up to 30-90 minutes to complete. To check the status, navigate to Manage > Deployments.
Part 3: Post Wizard Configuration
Post deployment a you should go to the host pool in the MyCloudIT portal and "configure FSLogix". This is a critical step that must be done before users log on to your session host. After this is done there will also need to be an the relevant host pool AD group assigned to the app group. Contact MyCloudIT support for post deployment steps.
- We are automating this process and is still in the testing phase. We will complete these steps for you. Please contact MCIT support for assistance.
Warning: This must be done before you move on to Part 4 or before you use AVD.
Part 4: Assign User Access
After waiting for 30-90 minutes, your deployment will be completed.
- We strongly recommend you configure backups now via the MyCloudIT portal. For additional information, see KB - Creating a New Backup Vault with Policies.
- You will need to now create new users or "sync" existing users. The users you create will need to have their UPN suffix as the same public domain you specified via Part 1. For instructions: KB - Active Directory User Management
- In our example deployment from above, a valid AVD user would be dwilliams@sparks-solar.com, whereas an invalid AVD user would be dwilliams@sparkssolar.local
-
A note for advanced environments, both AD and AAD need to contain the same synced user for that user to be able to use AVD.
-
You will now want to add users to the group that will grant them access to the AVD host pool. This can be done via the MyCloudIT portal under "Active Directory".
-
Note: You will need to add the users who you want to allow access to the host pool / application group to the AD group named: applicationGroupName-GRP where applicationGroupName is the name of your application group. This will follow the format prefix-AG where prefix is the deployment prefix you selected. In the example above, the group will be sparks-AG-GRP.
-
- Other General IT related tasks should now be completed, such as security implementations, windows updates, software installation, peripheral integration, application server creation, documentation, etc.
-
It is suggested that you make use of MyCloudIT golden images feature to customize and deploy session hosts.
-
We encourage you to use MyCloudIT autoscale to switch on and off session hosts based on 'capacity' or time based such as turn off session hosts over-night or weekends to save on Azure compute costs. For instructions: KB - Autoscaler Overview
-
User Access to AVD
Users can access AVD by logging in with their public username (UPN) at: https://rdweb.wvd.microsoft.com/arm/webclient/index.html
Appendix
Appendix A: VM Overview
A basic overview of the virtual machines that is created by default:
- Virtual Machine prefix-MSDC-001
- Operating System: Microsoft Windows Server Datacentre 2016 x64
- Roles: Active Directory Domain Services, DNS Server, File Server
- Domain Configuration: Domain Controller
- Disks: 1 operating system disk and 1 data disk
- Subnet: Core with network security group
- Default IP Address: 10.10.10.10
- Other: Public DNS address, public IP address
- Virtual Machine prefix-VDSH-n (where is 0 to 999)
- Operating System: Microsoft Windows 10 (various editions)
- Roles: AVD Session Host
- Domain Configuration: Domain Joined
- Disks: 1 operating system disk
- Subnet: Workload with network security group
- Default IP Address: 10.10.20.n (where n is 4 to 253)